


Ok. Here we are its 2010 and a long long time since my last post. Things at BUXTONbaby are taking off (hoot hoot) with a load of new products hitting the store, my own creations edging closer and closer to launch and my head is in a real spin. I have been thinking that perhaps getting back to this blog will be a welcome and calming outlet for my busy mind to unwind.
When I walked through the aisles of the supermarket on my own yesterday for the first time in recent memory since my precious son was born, it seemed like a very quiet place. It dawned on me that there were a load of new products on the shelves since the last time I could realllly wander around the aisles and take a good look. Maybe other people feel this way, I thought, unaware of something handy or yummy + natural and new. I know not everyone cares to walk around aisles looking for the latest thing on the shelf, and many don’t care for the supermarket at all.
Since I want my blog not only to be about my store but about useful things that might offer inspiration to others, I decided that this week I would be your personal field shopper ;) and share a few of the products that have hit the local supermarket shelves over the past year that we are loving: of course with a focus on organic, natural and/or sustainable produce. Stay tuned!
I also decided that every now and then I will choose a favourite shade of thread and share it with my sewist readers that might find it handy especially when ordering online. I don’t pick my thread shades by project as there is just too many on the cutting table to run back and forth to the store adding thread. Over time I have moved toward buying a selection of handy favourite threads that have seemed to match with a huge variety of projects. Of course we are making the change to organic thread now with a limited colour range, I will still use coloured thread for decorative and top stitching when required until a more sustainable coloured option is available.
Then from time to time I will share exciting snippets of up and coming creations from the cutting table, from special edition auctions for charity to new product and style launches. Our own organic fabric line, a new Australian made + owned organic bath and body range and the possibility of some in-real-life stockists of our creations are all possibilities to look forward to for us in 2010.
Welcome back to BUXTONbaby in 2010, thanks ever so much for following with us on our journey in business and in life.
Blessings to you and yours.
Pip B.
Tuesday, February 23, 2010
Tuesday, February 2, 2010
janome walking foot tutorial
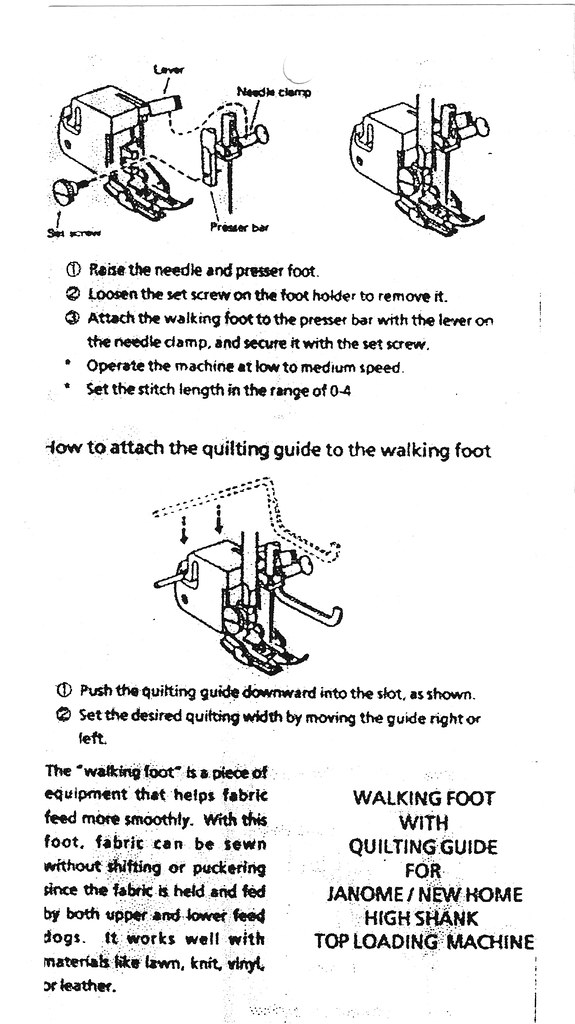
A while back I started playing with my Janome Walking Foot (also known as an Even Feed Foot). I’m loving this foot and using it for a load of general sewing. It is more traditionally a quilting foot but awesome for denim, minkee and any multi-layer project.
The foot has feed dogs for the upper layer of your fabric that work in unison with the feed dogs of your machine on the lower layer. This pretty much guarantees that you won’t let you fabrics slip or shift or pucker your fabric and helps ensure straight sewing. Alright, not guaranteed when you look away at your 1 year old when he calls and you are sewing a curve... but almost ;)
One thing I do remember is that the week I got the foot, I was pretty nervous about attaching it to my new baby – the Janome DC4030 (or otherwise known as the less crazy looking, more pink version of the Threadbanger TB-30 in the U.S). One of the only places I could find info when I was stuck was at Liesl’s blog Hoppo Bumpo – thanks L. I could also find replacement Janome instructions [small poor quality sketches] here.
Here goes, I have a little tutorial to share that might help put 2 and 2 together and give some confidence for a properly installed well functioning Walking Foot.
Installing your Janome Walking Foot:
Step 1. Take your starting positions!

Step 2. Get set.... pause a moment to notice this big bolt, a key component in changing from regular presser feet to your Walking Foot. Press the red release button at rear of foot to release and then remove any presser feet currently fitted (this was my ¼” foot w/ flange guide [lovely!]).


Step 3. Go! Loosen off the big bolt with supplied flat head screwdriver. I then find it easier to do the last few turns by hand so that the bolt ends up in my hands rather than falling on the table with potential to roll away. You are going to need this in a second, so keep handy.


Step 4. This is the result you are after. Naked! Note the little hole as you will need to line this up with your walking foot parts.

Step 5. Slide the walking foot to be hugging the naked pole, you need to have nimble fingers and lift the white bar over your needle tightening screw. This is layperson terms to make things easier and very technical speak ;)


Step 6. Use the nimble fingers you found in the previous step to place the bolt back into the empty hole, lining up the metal bars either side of the hole/bolt. Then tighten up the last few turns with the screwdriver for a nice firm fit and you are finished. Go make happy stitches!

Subscribe to:
Posts (Atom)


